10 Advanced Home Staging Techniques for Stunning Real Estate Photography
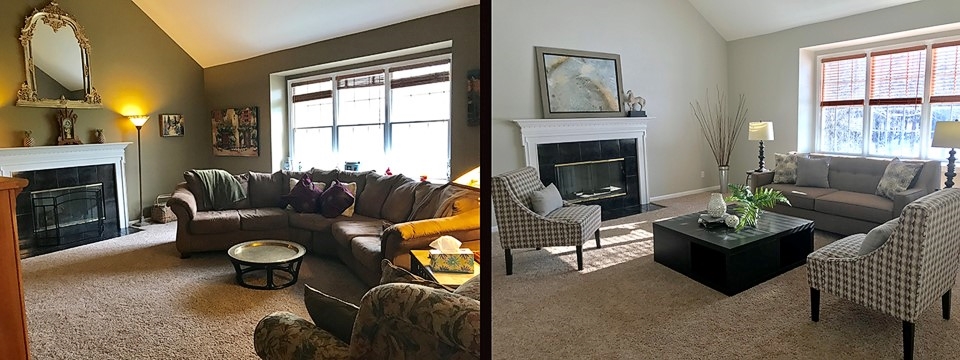
According to HomeLight’s Top Agent Insights Survey, most leading real estate agents (about 85%) believe that homes that have been staged are easier to sell compared to those that have not been staged. Additionally, around 65% of these agents claim that staging a home can lead to an increase in the sale price. Although there is an additional cost of approximately $1,719 per month for staging. The benefits of having more potential buyers and achieving better results outweigh the cost. You can learn how to transform an unappealing space into an attractive and marketable showroom by studying examples of homes that have been staged, along with these 10 advanced home staging techniques.
1. Clean Up the House and Organize It Before the Shoot

When showcasing your property through photos, it is important to demonstrate that it is well-maintained and attractive to potential clients. This can be achieved by thoroughly cleaning every aspect of the building. Including hard-to-reach areas, to ensure flawless real estate photos from any angle. The cleaning can either be done independently or by hiring a cleaning service through platforms such as AllBetter, Handy, or Fiverr.
It’s recommended to write down a list of the different things you need to do like fixing a dripping faucet, mending the guttering, filling a wall crack, etc.
2. Don’t Forget to Show the Purpose of the Room
To capture before and after photos of a staged room, it is crucial to have a well-defined plan and theme. While it is possible to convert an extra room into multiple spaces, such as an office and a gym, it is recommended to focus on one purpose. If the property has a suitable attic, it can be transformed into an office, and a nice basement can serve as an entertainment room. Similarly, a room that is typically used for storing miscellaneous items can become a guest bedroom. It is important to showcase the potential uses of every part of the house. Including smaller spaces like alcoves, window seats, corners, and breakfast nooks. If you lack experience in staging a room, experimenting with interior design software can help envision the final look and identify suitable elements to complement the space.
3. Show Organized and Decluttered Spaces

If your property is cluttered, it can divert the attention of potential customers from its attractive features and create an illusion of limited space. To avoid this, we recommend storing unnecessary items such as ornaments, papers, seasonal clothes, and untidy objects before starting the shoot.
Make an effort to clear all the shelves, coffee tables, and kitchen surfaces as much as possible. Use baskets made of wicker or rope to store items that are frequently used but not required to be visible all the time. You can also consider purchasing extra storage containers to create more space.
4. Add Natural Lighting to the Shot
To achieve optimal lighting for real estate photography, it is important to keep the curtains and blinds open and turn on all the lights, including those in closets. Additionally, it may be necessary to add some fixtures to improve the lighting. If existing fixtures are sufficient, clean them before the shoot. If some of the light sources are not functioning correctly, replace them with affordable options from retailers like Wayfair, Pottery Barn, and Schoolhouse. Another option is to browse the selection of new and used accessories on Facebook Marketplace. By following these steps, your pictures will be bright, attractive, and welcoming.
5. Warm Up Your Lighting

To create a welcoming ambiance that offsets the coolness of a space, it is essential to use warm lights that emit a color temperature ranging from 3000 to 4000 Kelvin. In order to achieve the desired effect in photos, we recommend opening the blinds to let in natural light and replace all the lights in the house with warm light bulbs. Alternatively, one can invest in a high-quality LED smart bulb kit that offers a range of color temperatures to choose from based on individual preferences.
6. Pick Furniture that Matches the Space

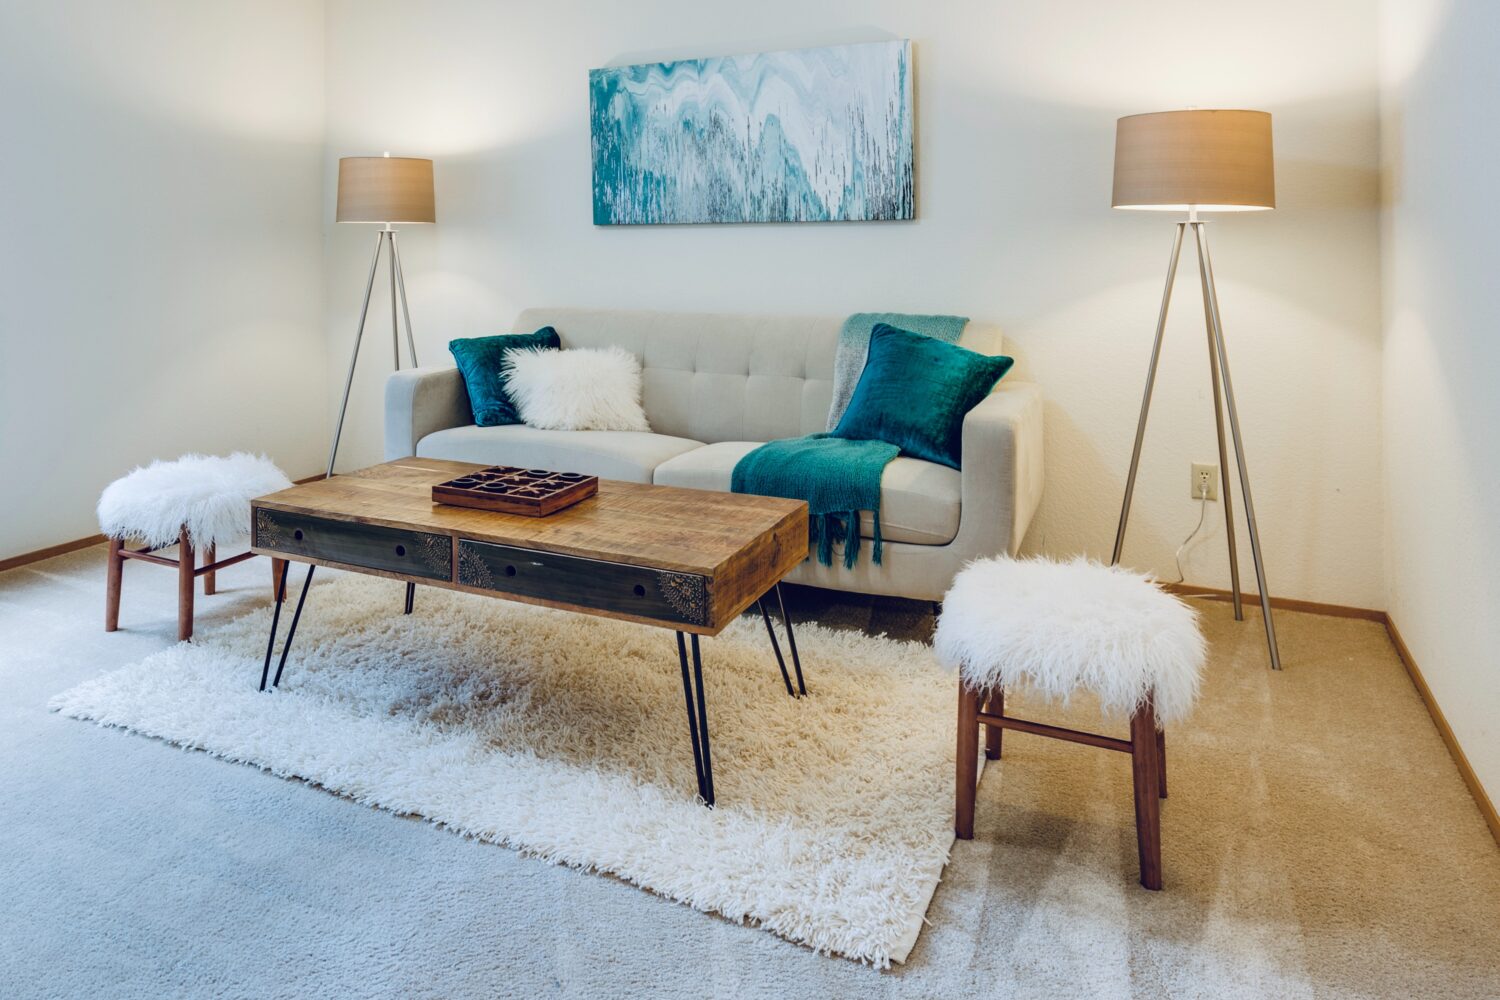
To help potential buyers envision the comfort of living in a staged home, it is important to follow specific spacing guidelines when capturing before and after pictures. For instance, we suggest leaving a gap of 14-18 inches between the sofa and coffee table. This will ensure easy passage for individuals while also allowing items on the table when seating on the couch. Additionally, a spacing of 30-36 inches between seating areas enables comfortable conversation while still leaving room for movement. To showcase the rug’s coverage of a room, we recommend to maintaining a distance of 12-24 inches between the wall and the rug.

To create a modern and organized living space that also feels warm and inviting, consider using realistically sized virtual staging software to add furniture and decorative touches. Unlike traditional staging methods that can be costly and unforgiving of mistakes, virtual staging offers a more cost-effective and flexible approach to testing out different designs that will appeal to your target audience.
7. Select Furniture with Clean Lines for Smaller Rooms
To prevent a small room from becoming too crowded, it’s best to limit the number of large furniture items and avoid bulky or trendy pieces. Instead, opt for more compact and low-profile models. If you’re looking to take visually appealing furniture photos, there’s no need to purchase new expensive items. You can use pieces from your own home or look for cheap options online. A simple coat of white or neutral paint can greatly improve the appearance of the furniture. Online marketplaces such as Facebook, Etsy, and Amazon are great places to find affordable furniture.
8. Prioritize Using Minimalistic, Non-Distracting Décor Items
Replace blankets that have complex patterns and worn-out dark décor items with bright elements to emphasize specific features of the room. You can purchase reasonably priced décor on platforms like the Facebook Marketplace, HomeGoods, Michaels, IKEA, Target, and Walmart.
9. Emphasize the Color
To create visually appealing rooms, we advise painting the walls in a neutral color and add accents to tie the space together.
Follow the 60-30-10 rule, 60% primary color, 30% secondary color, and 10% accent color. When selecting complementary colors for staging homes. We recommend choosing two tones on opposite sides of the color wheel or different shades of the same color.
10. Create Texture and Divide the Property into Zones
Using texture effectively can greatly enhance the visual appeal of your room in photographs. You can experiment with different combinations such as pairing soft rugs with hardwood floors. Alternatively, by incorporating stainless steel objects with sleek subway-style tiling. Additionally, incorporating textured carpets can create a cozy atmosphere, helping define the living room as a separate area. It’s important to consider the various options available to achieve the desired result.