OFF-CAMERA FLASH Photography Guide
When you think of off-camera lighting, you probably conjure up mental images of photographers setting up elaborate light grids or other professional studio equipment. However, with a flash and a little imagination, you can incorporate off-camera flash photography into your shooting repertoire without breaking the bank on lighting equipment. What exactly is off-camera flash photography? It’s using one or more flashes to light a subject independently from the camera’s built-in flash. Off-camera flash is an excellent way to add depth and texture to any photograph without appearing overly artificial. This type of lighting gives your subjects a more natural look, like you would get from the sun. It makes your photography look more professional and gives you more creative freedom. Even if you don’t have experience as a photographer yet, it doesn’t take long to learn the ins and outs of off-camera flash photography.
Understanding Off-Camera Flash Photography
Simply put, off-camera flash is any lighting technique that uses an external flash or other artificial light source to illuminate a subject independently of the camera’s built-in flash. Using more than one flash offers a lot of creative potential and can be a great way to add depth and texture to any photograph without appearing overly artificial. You can use off-camera flash in basically any situation where you need more light than your camera’s built-in flash can produce. It’s an excellent way to add shadow to brighten up a subject and to fill in shadows created by sunlight.
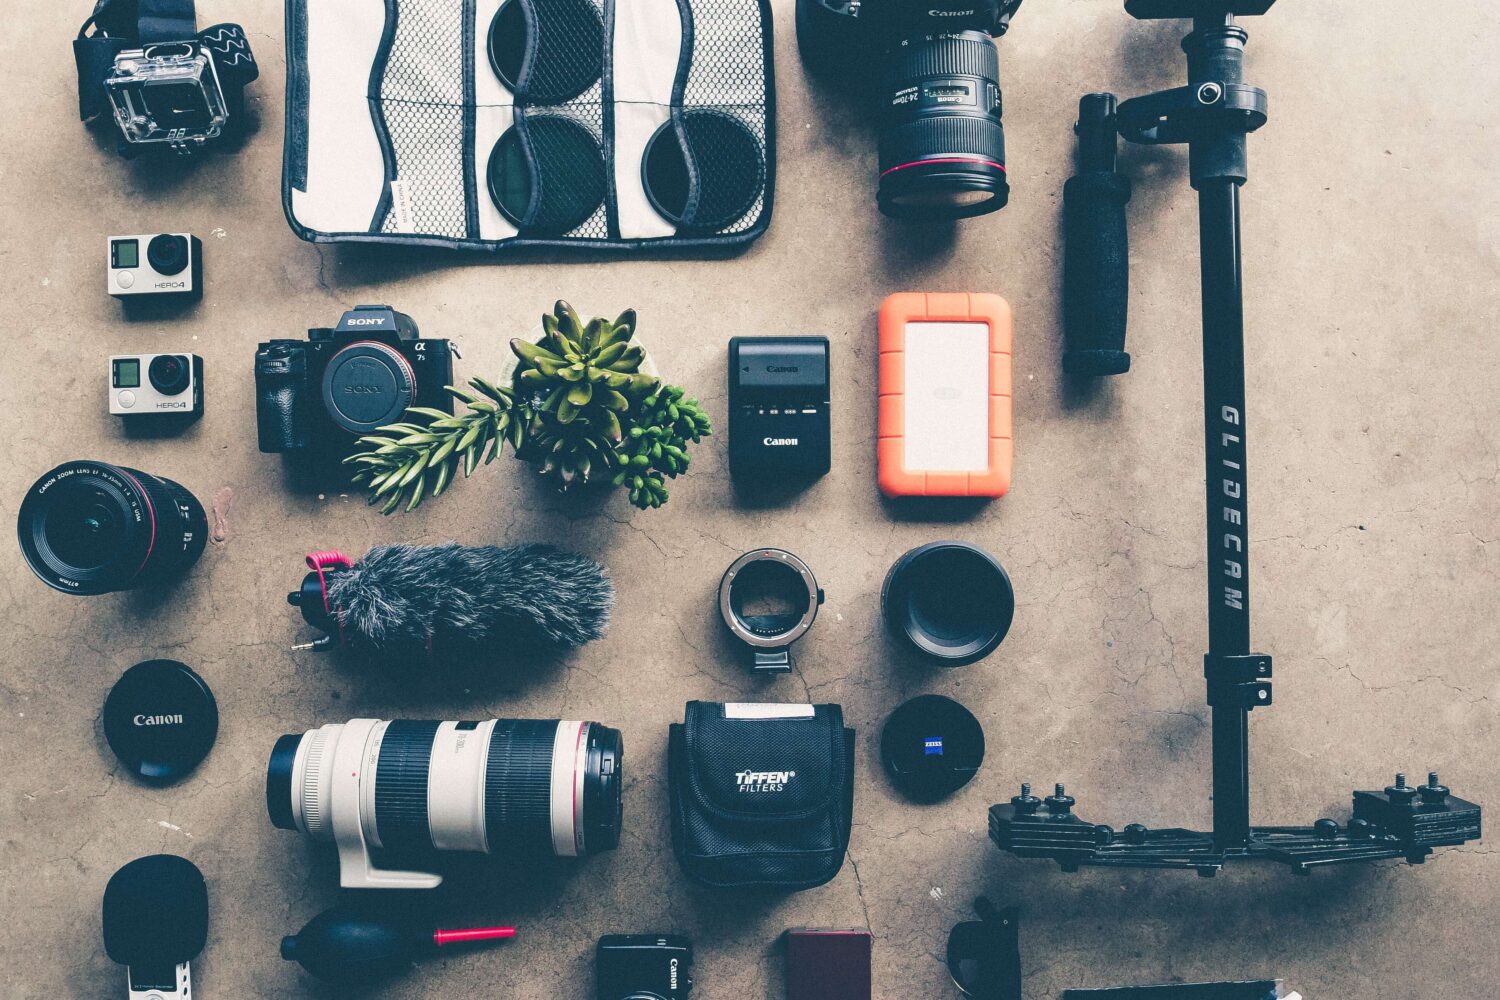
Essential Off-Camera Flash Gears Requirements
When you’re getting started with off-camera flash photography, you don’t want to invest a lot of money in equipment if you’re not sure that this is something you’ll continue doing long-term. The good news is that you can get started with minimal investment. You’ll need a flash – Radio triggers can control remote flashes from as far as 100m away, but infrared triggers only work up to about 5m away. Most photographers use flashes with built-in receivers, but if you have older flash units, you can buy receiver units that will work with them. You’ll also need a way to trigger the flash. Many flashes can be controlled with a simple switch on the side of the flash, but if you’re photographing in very dark environments, this may not be enough to trigger the flash. In that case, you can use a radio trigger to fire the flash remotely.
1. Speedlights
The flash needs to be on the off hand side to avoid casting shadows on your subject. Placing the flash on the off hand side will allow you to control the direction and intensity of the light for your photo. Most speedlights will allow you to change the angle of the flash head to adjust the light direction. With this flash position, you have the advantage of being able to simultaneously light your subject and avoid casting shadows on your subject.
Most speedlights have a swivel head which allows you to adjust the direction of the light. You can change the angle of the flash head to adjust the light direction.
Swivel heads on most speedlights will allow you to change the direction of the light.
2. Remote triggers
Remote trigger devices enable photographers to fire their flash units remotely. For example, you can be in the shot, or behind the lens, while your flash is on a stand or mounted to your camera. Remote triggers enable you to do this with ease. There are many different types of remote triggers, so you just need to find the one that best fits your needs. There are ones that plug directly into your camera’s USB port or SD card, while others have a long range and can be up to 100 meters away. You can also get a remote trigger that works with your smartphone, or one that uses Bluetooth. Depending on the type of remote trigger you get, it will have different features. Some will let you control the power output of your flash, while others will let you change the color of the light.
3. Light stands
A light stand is one of the most important accessories for your flash photography. It is necessary to hold your flash up in the air where it is best placed for the best light quality and coverage. It can be used in a variety of ways, from holding up a diffuser or umbrella to holding a reflector and can furthermore be used to position flash units up high to reduce the likelihood of casting shadows on your subject. They can be used to angle flash units towards the side of the frame or away from your subject to control light fall-off.
4. Light shapers
The best light shapers like diffusers, umbrellas, and shoot through umbrellas, can be used to soften light, create a larger light source, and reduce the contrast between light and shadow. In addition to creating flattering light on your subject, these light shapers will also help to reduce the risk of your flash being too harsh. If you are using a flash to light your subject, the light will be very directional. If you are close enough to touch your subject, the light will be very harsh and unflattering so it will help to create a larger light source, making the light less directional and therefore less harsh. If you are going to use a flash to light your subject, remember to experiment with light shapers to find the one that works best for you.
5. Camera with a hot shoe
For flash photography, a hot shoe is essential to connect an external flash to the camera. An external flash is often used for portrait photography as it allows for more light and variation compared to a built-in flash. The flash shoe allows you to mount the external flash onto the camera, and you can use the flash sync cable to connect it. The sync cable will allow the flash to fire at the exact moment the shutter opens, which will allow for a more professional look to your photos. You can also use the hot shoe to connect a flash trigger, which will then allow you to fire the external flash from the built-in flash on the camera. Flash triggers are extremely useful if you are using a non-SLR camera, as they will allow you to trigger the external flash with the shutter button on the camera instead of requiring another manual step.
Know how all of the off-camera flash gear fits together
Although it can be done with a bit of ingenuity, it isn’t recommended to use the camera’s built-in flash for off-camera flash photography. The built-in flash is designed to fire at close range, which causes shadows and a distinct “flash” look. The basic components of off-camera flash photography are a camera, a flash and a sync cord. A sync cord connects your flash to the camera’s hot shoe, allowing the flash to fire at precisely the same moment as the camera shutter. The flash can then be placed anywhere you like, as long as it is within the flash’s maximum range. The camera is the device that actually triggers the flash. The flash is the device that actually produces the light.
The various methods of triggering flashes
There are several different methods that you can use to trigger your flash while off-camera. The method you choose will likely depend on the type of camera you are using, as well as your budget.
Manual Flash – This is the most basic technique, but it can be effective if you use high-quality flash units. It involves setting your flash units on manual and adjusting the power settings so that the units fire. You can do this with your camera or a remote trigger.
Hot Shoe – A hot shoe is a connection on top of your camera where you can mount a flash. It’s called a hot shoe because it uses a dedicated electrical circuit inside your camera to trigger the flash. You can set the flash to either manual or automatic mode.
TTL Flash – If you’re not interested in getting into the nitty-gritty details of flash power output, you can use a built-in flash in conjunction with an external flash and the camera will automatically synchronize the two units. This is called TTL flash, and it’s the easiest method of triggering your flashes. You can set your camera on auto or manual mode.
Get perfect exposures using the manual mode
In the manual mode, you get to control every aspect of your photograph, including shutter speed, aperture and ISO. Using a flash in manual mode gives you three options for flash exposure: under, normal and over. If you want the flash to fire normally, select the “normal” option. If you want the flash to fire under normal conditions, select the “under” option. And if you want the flash to fire at a reduced intensity, select the “over” option. Flash exposure can be easily controlled manually using the +/- buttons on your camera’s control panel.
Discover how to make beautiful light for stunning images
When you’re taking photographs of people and you’re using your camera’s built-in flash, it’s easy to end up with images that look overly artificial. Using off-camera flash gives you more control over how your subjects are lit and can help you avoid this problem. You can choose where to position your flash and how brightly to shine it. This lets you create shadows that add texture and depth to your photographs. You can also use multiple flashes to light a scene from different angles. These subtle differences in lighting can make your photographs stand out among the crowd.
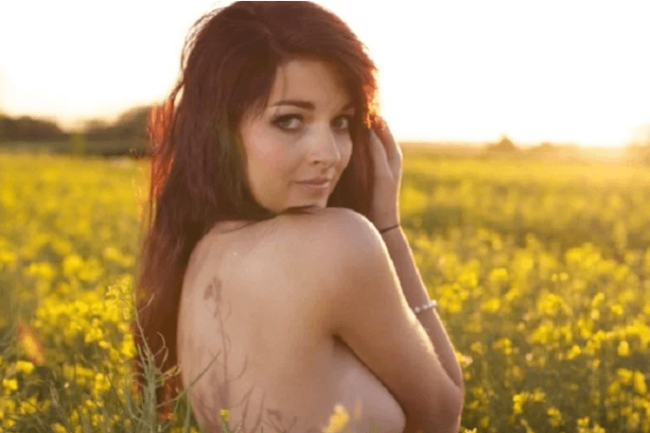
You can use fill light to brighten up shadowy areas of a photograph, whether there is something blocking the primary light source or the ambient light is too dim. The dark spots in my photograph below might have resulted from either the absence of ambient light or the presence of something blocking the sun. To create even lighting on the subject’s back, I employed a flash on the near side.
Recreating ambient light indoors
When composing your photograph, ensure that your subject is placed close to the centre of the frame. The goal of off-camera flash photography is to add light to a scene that already has natural light. Avoid taking photographs in complete darkness, as they will likely require additional light to be adequately usable. Similarly, you also want to avoid taking overly bright photographs. If you are taking a photograph inside a room that doesn’t have any windows, you may need to turn on the lights to brighten the room. A great photography hack is to position one or two off-camera flashes to the ceiling and direct them at your subject. Fill the room with light that looks natural and ambient by aiming your flashes at the ceiling. Diffusers or softboxes are preferred for this technique. Avoid using bare bulbs, as their flash power is too harsh. This picture was taken using a diffused flash positioned on either side of the model. The soft lighting produced by the flash reduced shadows and produced a natural look. It appears as though it has been taken using ambient and natural light.

How to disguise your off-camera flash to make the lightning look natural
One of the biggest advantages of off-camera flash photography is that you can control the background in your image. Using a flash with a diffuser, you can add subtle, even light to a background without overly darkening the scene. If you don’t have a diffuser, a piece of paper or a cardboard box will work in an emergency. If you want to light only the background, turn off your flash’s autofocus and manually focus on the background. Once the background is sharply in focus, use the flash as normal to light the rest of the scene. If you want to light both the foreground and the background, zoom out the flash and turn on the autofocus. The flash will then be adjusted to accommodate both the foreground and the background.
It’s important to point out that a flash was used to lighten the scene, but not to alert the viewer. To accomplish this, I position the flash in locations where the light appears to come from the scene itself. This picture was shot using this strategy. I wanted the angle of light to mimic the subject’s position, so I positioned the flash to the upper left of the image. It appears to be a home lantern rather than a camera flash because it is positioned outside the picture.

Know how to balance ambient and flash light
With experience, you’ll be able to judge how much flash light and ambient light is necessary for each scene. If you’re in a room with plenty of natural light, you may only need to turn on your flash to light your subject. If you’re taking a photograph in a dimly lit room, you’ll likely want to turn on all of the lights in the room and use your flash to light the subject. Even if you’re using your flash to light the subject, you can still incorporate the existing light in your photograph. Simply use a slower shutter speed to let more light into your image. The slower shutter speed will allow the existing light to “bleed” into the photograph and give your image a hazy, ethereal appearance.
Using the off-camera flash as set lighting
On the other hand, if the model is already well-lit, you can use the flash on other parts of the scene. Using the flash positioned between the two stones at the bottom of the frame, I was able to lift the frame’s bottom and illuminate the model’s face. The hard rocks acted as a natural corridor for the light, illuminating her face, while her soft skin was in contrast to the hard rocks.

in Conclusion
Trying out a fresh approach, answering questions with our existing gear, and saving money to buy something new if it improves your unique talents, can be both enjoyable and a step forward for your business. However, for those wishing to photograph natural light versus artificial light, especially if on a budget, I would recommend mastering what is accessible and free first. There is no cost to using natural light, and it is available day and night if you study and investigate it carefully. Because it is new to you, be patient and diligent.
All that said, shooting is just one aspect of the creation process. Post-production brings the final product together. At Havah, we provide HDR and Flambient photography photo editing services. Please feel free to peruse our services if you are interested.