Real estate photography stands apart from other photographic disciplines in its combination of art and business. To be successful as a real estate photographer, you need to understand both.
Half the challenge with real estate photography is developing your individual artistic style. “Your style is your business card. It’s your marketing, your trade,” explains real estate and aerial photographer Jonathan Boone.
Thus, post-processing is an unavoidable, inseparable part of professional real estate photography today. Choosing the right software tool for post-processing your work efficiently is as important as having the right camera and lens combination for the job.
Adobe is a software development company best known for its powerful graphics tool Photoshop and Adobe has developed a somewhat different piece of software called Adobe Photoshop Lightroom. It quickly became the most important tool for photography.
In this article, we will explain about Adobe Photoshop Lightroom and why it’s such a great choice for aspiring photographers.
What is Lightroom?
Adobe Lightroom software is adaptively integrated on both Windows and MacOS platforms. Not only that, but Adobe is also very fond of this software when it is released on mobile platforms.
The most typical function of Adobe Lightroom is batch editing and management. Especially digital photos. Take photography’s editing and photo editing to the next level.
As a photo editor, Lightroom includes a subset of Photoshop’s features that are custom tailored to the contemporary photographer and the image manipulation tools you’ll most likely need.
With all its tools and no-nonsense user interface, Lightroom lets one organize, post-process, print and share photographs, all in one environment.
When using this software, the tool allows you to view, manage, edit and colorize a series of images in the same collection. As a result, even photos with different lighting and colors can be adjusted to the same color gamut, one tone to create cohesion and synchronization.
Lightroom software gives you a lot of suggestions about filters, effects, … You can freely use or create your own personal filters to be able to own a beautiful set of images with a personal impression.

When should you use Lightroom?
When it comes to workflow, Lightroom is arguably much better than Photoshop. Using Lightroom, you can easily create image collections, keyword images, share images directly to social media, batch process, and more. In Lightroom, you can both organize your photo library and edit photos.
Why should you use Lightroom?
Lightroom (LR) is the place to begin for getting started with photography. It is also much easier to use than Photoshop. You will realize quickly that LR will be a time save for photographers who shoot raw images in volume
Lightroom helps you import, organize, manage, and find your images. And it is photo management and photo editing, combined into a single tool.
These two essential elements of digital photography, plus the non-destructive nature of Lightroom editing make Lightroom the most popular choice with photographers.
Photo management
Photos are the property of the photographers. What’s the worst thing that could happen to you, if you lose them or waste a huge amount of time searching for them?
Photos are very precious. So, for us, having a well organized photo filing system with quick and easy backup facilities is absolutely essential. Within seconds and just a couple of clicks I can find any photo from any shoot within a Lightroom catalog.
Good folder hierarchy also makes finding photos the traditional way super easy. Then there’s collections. Lightroom collections are magic for gathering and working on photos from different shoots in one place.
No photos were harmed in the process of this edit
The massive, massive advantage of Lightroom is that the catalog of edits is separate from the actual photos. In Lightroom, unlike Photoshop, you never actually alter the photos themselves – it’s non-destructive editing.
If on the days that you get the editing bug and go a little nuts, maybe a little too far on the editing, it’s fine. Lightroom records the editing history so you can easily go back to any point in the edit and start over. Or you could just hit reset and start from scratch again.
Lightroom as a quality protection tool on social media
Have you ever felt the need to explain that Facebook messed up your photo and that it actually looks a lot better than the version you posted?
Social media platforms crunch the photos we post if they are too large in memory. No problem!
Lightroom to the rescue!
You can create export presets to size your photos perfectly for the different social media platforms. So the quality is much better.
Plus, like any preset, export presets speed up your workflow, because you don’t have to re-enter the settings every time you export a photo.
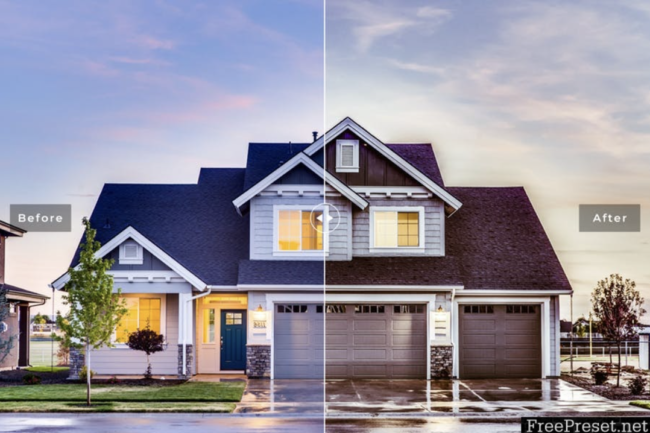
Use Lightroom for professional looking photos
Here’s the difference that Lightroom can make with your photos. This photo is, of course, and exaggeration but the reality is not too far off. If you follow photographers that are further on their career and how their photos look. Editing software like this is the explanation. Editing software alone is not enough. It is also the hours of practice and tweaking that created amazing images.
Next, we will go in-depth on how you can use Lightroom to make your photos look amazing.
How to edit real estate photos in Lightroom?
Editing Exteriors in Adobe Lightroom
Adjust the exposure.
Check the exposure of your photos. If it’s underexposed, try to recover the exposure by dragging the exposure bar. Adjust the exposure accordingly depending on what the image needs. You can also adjust the contrast in order to add a little punch to your image.
Change the highlights and shadows.
Move the highlights bar to the left in order to remove the hotspots in exposure. If there are dark areas in the photo, up the shadows bar in order to bring in the details to the photo. Ensure that you fine-tune the highlights and shadows as you seem fit.
Set the whites and blacks.
Hold the Alt key on Windows or the Option key on Mac while dragging the Whites slider to the right in order to expand the brightest whites. The screen will turn black and you will have to continue dragging until you see dots of whites. Hold down the same key for the Blacks slider while you’re dragging it. This turns the screen white. Continue dragging the slider to the left until the black areas in the photo start to appear. This adds a punch back to the image.
Move the clarity.
Add a little bit of clarity to the image by moving the clarity slider. This adds a little blow to the mid-range tones without affecting the highlights and shadows.
Adjust the temperature.
Once you have a good overall exposure on your photo, check the temperature of your photo. If you think adding a cool tone to the image is important, drag the temperature slider to the left until you’re satisfied.
De-saturate the correct colors.
Scroll down to the HSL/Color/B&W tab and click on the saturation option. To choose a specific color that you want to desaturate or over-saturate without affecting the rest of the image, click on the small clicker box, pick the area that you want to desaturate and drag the mouse down.
Define your skies.
If your image is shot outdoors and you have a washed out sky, what you can do is click on Luminance and drag the Blue slider to the left in order to bring the color out.
Control the detail.
Adjust the amount of sharpening by moving the sliders around. Add a little bit of radius just to put in some details on the photo. With masking, hold the Alt or the Option key down while dragging the slider to the right. This adds a little sharpening to the image.
Do a little noise reduction.
If you’ve upped the shadows, you may need to increase the luminance a little bit. This removes the grain that your image has from sharpening.
Click on the lens correction.
In Lightroom, there are options for lens correction. Tick all the options or boxes under lens correction and click vertical adjustments. The boxes are: enable profile correction, remove chromatic aberrations, and constrain crop. This adjusts your image immediately. You can readjust vertical corrections by increasing the vertical correction to bring out the edges of the building or home. Check the verticals to ensure that they are aligned properly.
Editing Interiors in Adobe Lightroom
Editing interior photos can be quite different from editing exterior shots. Often, you get slightly underexposed images because you’re working indoors.
Adjust exposure.
With these shots, adjust the exposure slider to the right and add a little contrast to the image by dragging the slider to the right. Adjust depending on the needs of your image.
Modify the highlights and shadows.
Since you have light coming from the windows, you may want to pull down the highlights a bit to the left. Bring up the shadows bar in order to level out the darker areas of the photos.
Raise the whites and blacks.
Hold down the Alt key if you’re on Windows or the Option key if you’re on Mac, and drag the Whites slider to the right until you see specs of white on the black screen. For your blacks, hold the same keys and drag the slider to the left until you see a couple of specs of black show up.

Some Lightroom Tips For Real Estate Photographers
A Calibrated Display Is A Must-Have
First, you need to set the foundation for viewing our images correctly. This requires a display that has been calibrated to deliver accurate colors and contrast.
An image may look correct on your screen, but in reality, the display is making its colors, contrast, or overall brightness appear significantly different from what they’ll look like in print or on other people’s displays.Your calibration device doesn’t have to be the most expensive, any of the popular ones will work well.
Over-Edited Photos Can Look Unprofessional
What “looks good” for real estate photos in particular? This question is particularly important to anyone who is just starting out and delivering their very first few jobs.
At first, it can be very easy to overdo it with editing. So, always be careful when cranking up the Contrast, Saturation, or Dehaze/Clarity sliders too far! However, most scenes with good contrast and color shouldn’t need too much extra attention besides a little bit of tonal management, and white balance fine-tuning.
As a general rule, many real estate agents and market areas in general will, indeed, prefer images to be processed on the brighter and ever-so-slightly warmer side. Why? Because it makes a home seem very inviting, welcoming, to potential buyers!
Use Lightroom Presets To Quickly Start Every Scene
Most real estate photography jobs will involve shooting a bunch of photos from just a few rooms or outside angles. What this means is, a lot of your images will receive nearly identical edits.
So, if you frequently find yourself performing a few very similar adjustments, try creating a preset that is the approximate average of those common adjustments.
Use Auto-Sync To Edit Entire Scenes At Once
If you are editing images from the same angle, or in the same room with the same light, contrast, and overall exposures, you should select all of the photos from that scene and turn on Auto Sync before editing.
With Auto Sync on, you can edit the primary selected photo, and Lightroom will match each adjustment for all the other selected photos.
Then, all you have to do is just deselect the additional photos, and briefly go through them one at a time.
Use Quick-Develop To Adjust Warmth And Brightness In The Library Module
You don’t have to go back into the Develop Module and individually correct every single image one at a time. You can use the Library Module instead, and do it all at once. Just select all the photos, turn on Auto-Sync, (visible in the Loupe Mode of the Library Module, but not in Grid Mode) and use the Quick Develop adjustments to “bump” your main image’s exposure, white balance, or contrast…
Quick-Develop changes each image by the same amount, without totally synchronizing the final position of the slider!
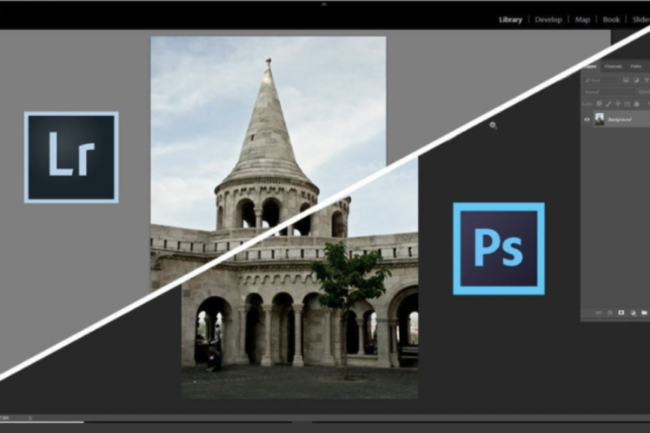
Comparison between Lightroom and Photoshop
Both are capable of handling multiple file types such as: JPEG, PNG, TIFF, and a perennial favorite of many photographers, RAW.
Lightroom can add filters and change exposure and colour settings. Edit photos easily with Lightroom presets, Super Resolution, easily share photos from any device, and access your projects anywhere with cloud photo storage management.
Photoshop can create beautiful images with Photoshop brushes, Content-Aware Fill, Photo effects, Neural Filter, Sky replacement, and the many tools photographers rely on.
How much is Adobe Lightroom?
This question is one that many people asked a lot.
Now you can get the Adobe Creative Cloud Photography Plan which comes with Lightroom + Photoshop and costs only $10 per month. This is an incredibly smart move by Adobe to attract amateurs to its professional tools.
What are some alternatives to Lightroom?
Some of the best Lightroom alternatives:
Adobe has brought Photoshop 2021 more powerful tools like Sensei AI and even the ability to stream to Photoshop for iPad.
There are many new features on Photoshop 2021, greatly supporting users from amateur to professional :
Brush search tool: Now, users can quickly type the name of the brush type they want to use and the software will display the corresponding tool version.
Preset Search: Quickly search for preset
Smart Portrait: Quickly adjust the subject in portrait photos, including: facial emotions, change hair direction, head in the direction of light
Sky replacement: Adjust the sky parameters to your liking (color, reflection …)
Quick Actions: quickly adjust the background (separate background, remove fonts, convert black and white)
Live Shapes: Customize blocks including: No border, height adjustment, width, subject reversal …

Adobe Bridge
This is a standalone organization tool in the Adobe suite of applications, mainly used to manage your Adobe files and organize them as best and as quickly as possible. In fact, the organization capabilities of this application are very powerful. If you want, you can even use it to organize all kinds of files in your computer.
Features of Adobe Bridge : File Browser, File Management System, Image Previews, Image Review Mode, Filtering Images
Skylum Luminar
Luminar includes both tools for organizing images and editing them, leaving the original RAW files untouched. And thanks to a focus on artificial intelligence, it even has some options that Lightroom doesn’t.
Luminar has many of the same editing tools as Lightroom but it starts off with a bigger focus on presets and one-click edits. This can help newbies get acquainted with the software. Despite the push for presets, the advanced editing tools remain intact if you prefer a hands-on approach.
Luminar has a handful of unique tools – particularly ones developed with A.I but there are a few things that Lightroom still does better. Lightroom’s range masks make local edits simpler and the healing brush tool also seemed to perform faster.
The program costs $69 perpetual license
Snapseed
This is free and it is more of an image editor. It is an ideal software if you need a Lightroom alternative, but you cannot use it on PC. It only works on Android, Iphone, Ipad and Tablet.
Can you go without using Lightroom?
We think you don’t necessarily need Lightroom, unless you want to do really complex editing. There are many other systems for editing photos, some of which are free.
But, if you’re shooting RAW files, Lightroom will be the best option as it is simpler, more intuitive than Photoshop, and much more powerful than apps like Picasa or Photos.
Lightroom helps you organize and edit the images you took. The introduced plugins and presets are very useful for real estate photographers to create exceptional and high-quality images of buildings, houses, and rooms
Conclusion
For most real estate photographers, Lightroom is your ideal choice. Accordingly, the adjustment of digital photos is very easy and you can manage the images in the best way. This becomes necessary when you take multiple photos and need to edit them in sync at the same time.
Hopefully with the knowledge that we have just shared with you; will help you get a better overview of “What is lightroom?”. As well as helping you choose for yourself a suitable software for your job.
Finally, if you want the best lightroom edited photos for your real estate photography, consider our services. We provide high-quality services related to any editing for real estate photos. For more information about our services and related blogs, keep visiting our.